Как установить routersploit на ubuntu

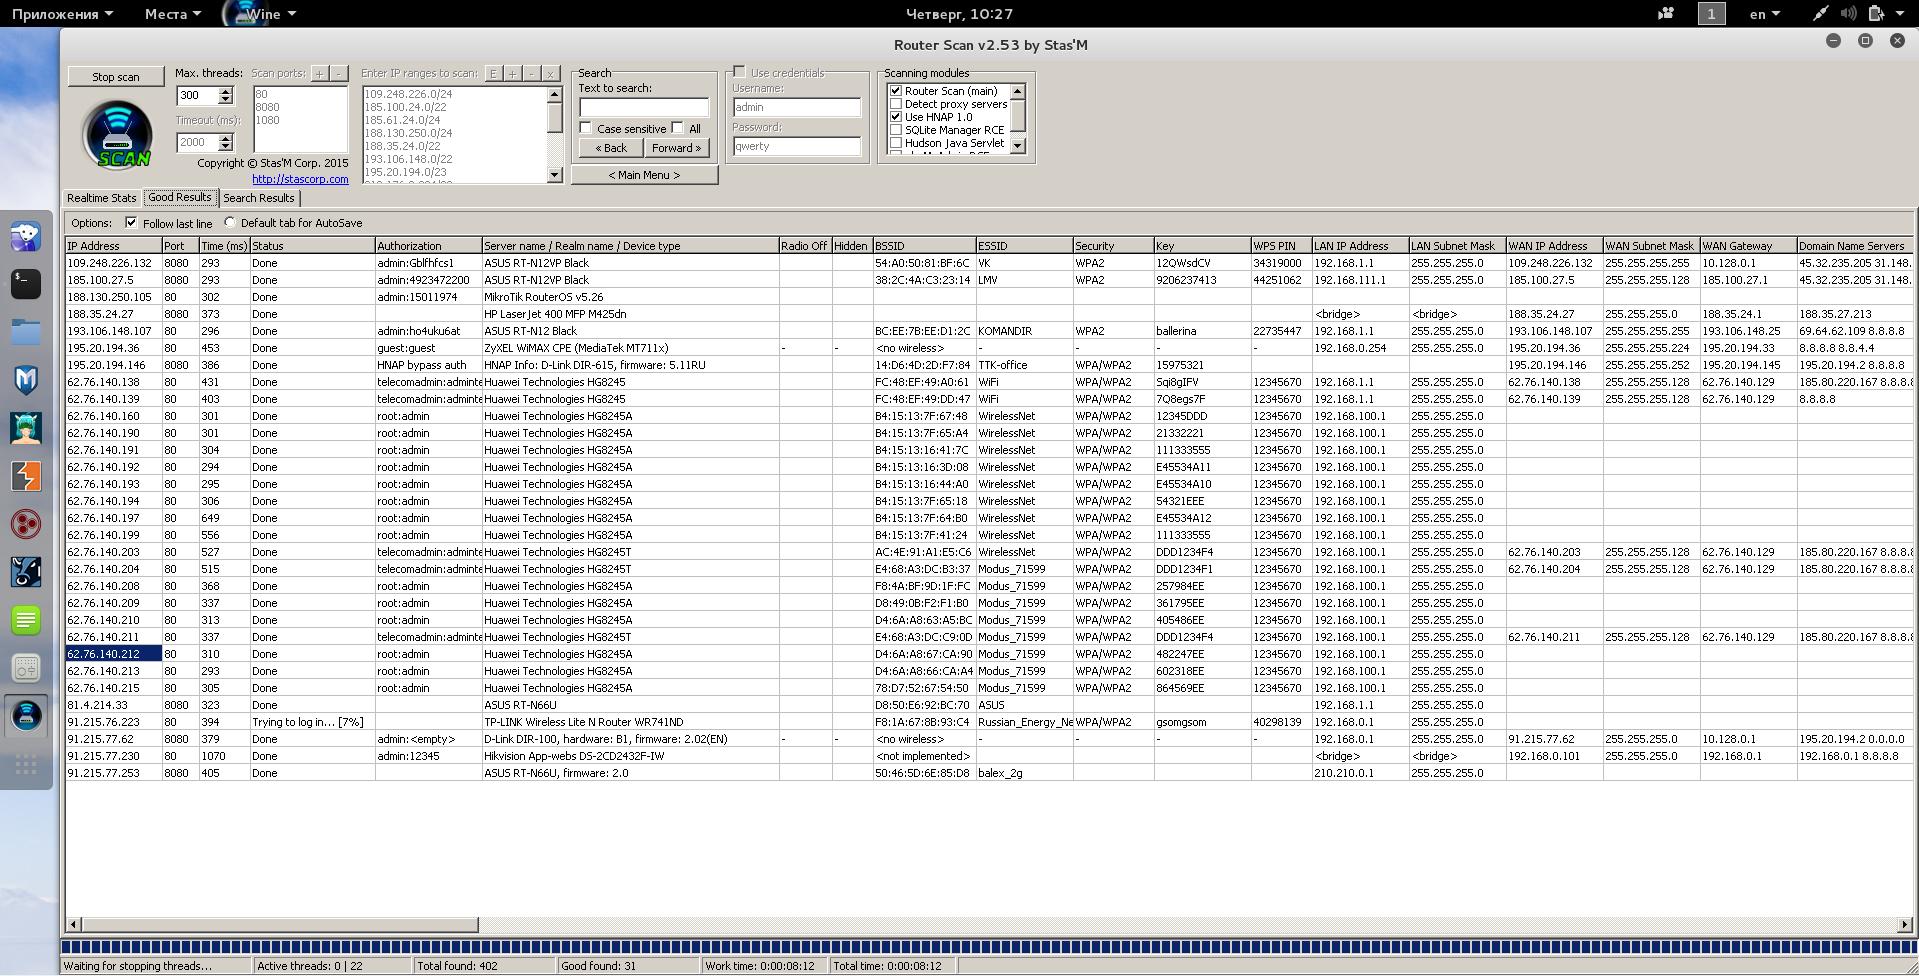
And this is RouterSploit (yes, there is no GUI):

In addition to the common goal, the programs have several common features:
- both programs try to guess routers’ default credentials
- they use small but very effective dictionary
- use exploits to hack routers.
In RouterSploit, everything is different: without a graphical interface, all targets are set manually, and you cannot specify a subnet - each router needs to be specified individually. If the vulnerability lies in the remote execution of the code, you will get remote shell (not all attack are performed automatically to obtain credentials).
The number of exploits and supported routers in these programs is different.
In addition, RouterSploit cannot brute-force default credentials without attacker participation.
The conclusion is this: these are two quite different programs, and if the result is not achieved with help of one, then you should try the second one.
RouterSploit Installation
Installation on Kali Linux
For installation from the official repository Kali Linux (version may be outdated):
Or to install the latest GitHub version:
Bluetooth Low Energy support:
Installation on Debian
Bluetooth Low Energy support:
Installation on Ubuntu, Linux Mint
Bluetooth Low Energy support:
Automatic checks a router for all vulnerabilities with RouterSploit
RouterSploit has automation a bit. It can check one router for all vulnerabilities and weaknesses.
For this purpose, there is an AutoPwn module. The module scans for all vulnerabilities and weaknesses at once.
As a test router, I take one on IP 83.17.188.82 and on port 80.
Start RouterSploit. Depending on the installation method, this is done like this:
In the started RouterSploit enter (use TAB to automatically terminate):

to see the options:

We need to set the target IP address:
You do not need to set the port, because it is the same as the default port. Otherwise, use the command like this:

To start the module, just type


tells us that the router is vulnerable to two exploits.
To deselect the module, type
or just select another module.
Scanning routers of certain vendors for vulnerabilities and weaknesses
If we know the manufacturer of the tested router, but do not know its exact model, and do not want to check it with all exploits, then we can use the exploit scanner, which only uses certain modules when scanning.
I watch its options:
I set the target:
The result is the same as the previous one, but less time is spent and less requests are made:

RouterSploit: how to test for a specific vulnerability

If we know the manufacturer of the router (D-Link) and its model (DIR-300), and among the exploits we found something consonant - dlink/dir_300_600_rce, then we can check if the tested router is vulnerable to this exploit.
Choose it for use:
We look at the information about it:

As you can see, the target device is present in the list of vulnerable.
Set the target (and port, if necessary):
If we do not want to exploit the vulnerability, but only want to check if the router is vulnerable, then the test is run like this:

As we see, the target is vulnerable.
Using RouterSploit exploits
After you find the appropriate router vulnerability, select the matched module:
Set the target (and port, if necessary):
And start the operation:
Look at the changed command prompt:

It means that the commands you enter will be passed directly to the vulnerable router:
Using RouterSploit Results
RouterSploit exploits allow you to:
- get the password in plain text
- get password as MD5 hash
- execute commands on a remote router
- path traversal, download files
- authenticate without password
- change password
- change another settings
All vulnerabilities in one way or another allow changing the settings of network equipment for the implementation of subsequent attacks. Let us consider the vectors of attacks in more detail.
Credentials in cleartext
The options that allow ones to authenticate (password in clear form, authentication without a password, change the password) are reduced to the fact that we get access to the administrative panel of the router and full control over its settings.
This gives the attacker:
- change the router firmware with backdoored one (difficult way, requires the skills of unpacking/packaging firmware of embedded devices, a deep knowledge of Linux OS; firmware are available not for all routers, but if successful, gives unlimited possibilities to control the router and track traffic);
- block the Internet connection for router users (a simple option, just change the settings to incorrect);
- if the router supports one or another implementation of the VPN, it is possible to connect it to a specially configured VPN server of an attacker, and all the man-in-middle attack opportunities become available;
- find out the password from Wi-Fi, turn on the Wi-Fi module if it is disabled (in case of special importance, one can arrive at the router’s location, to perform a man-in-the-middle attack);
- changing DNS settings to IP of attacker’s DNS server (medium complexity way).
All of the above is true for bypassing authentication and vulnerabilities that allow changing the password.
How to use remote code execution vulnerability of routers
Having the ability to execute commands on the router, you can try to find the password from its administrative panel. The firmware of the router is a very lightweight, restricted Linux. Usually because of the limited resources of a router, DBMS servers are not installed, so the password should be stored somewhere right in cleartest file. The exact location of the password, as well as its appearance (in clear form or in the form of a hash) depends on the particular model of the router.
I will show an example of a successful search for a password, I think you will catch the gist.
We return to the router, which we tested above. As I said, router OS is restricted and many familiar commands, such as find and locate with which you can speed up the search for files by their name and content, can be absent.
However, there are enough two commands
Let us see the contents of the root directory:

In the /etc folder, I found nothing similar to the password file:
But in the /var folder
A passwd file was found. Let us see it:

It seems everything was even easier than I expected.
I walked around a little more, I found another file:

See what beauty, even there is captcha. Unfortunately, in this case it did not help the owner of the router.

Enter the credentials admin:szafazpl and we are inside:
Approximately the same should be done with the vulnerability of "path traversal".
If you cannot find the password so easily, you need to examine the source code of the HTML pages and scripts responsible for authentication to determine which files they are accessing. If there are enough privileges, you can modify the source code of these files so that when they receive the password they dump it in cleartext.
Another example, I check my own router (you also should start from this point). Usually routers on the local network have IP 192.168.0.1 or 192.168.1.1, the usually web interface is available on ports 80 or 8080. To find out the IP of your router, type
It will output something like:
Here, 192.168.0.1 is the IP of my router.
Instead, you can use one line command:
It immediately outputs the required IP:


To my horror, the router was vulnerable. In this situation, my kilometer passwords with special symbols have lost their power. Let us go deep:

We are warned that only the first 256 characters will be shown. If this does not suit us, then it is recommended to use reverse_tcp. Therefore, the ls -l command turns into ls, so that there is more useful information in the output.
In this router, user names and passwords are stored in typical Linux files:

On Linux operating systems, information about users can be found in the /etc/passwd file. Despite the name, there are no more passwords in this file. Already a long time ago they moved to the /etc/shadow file, and they are stored as hashes. Details about hacking passwords from the /etc/shadow file are below.
Cracking MD5 hashes of passwords
To be able to use a password in the form of an MD5 hash, it needs to be decrypted with brute force. To begin with, try just google MD5 hash, there is a possibility that it will be immediately found in one of the rainbow tables.
If the rainbow tables are unlucky, then it is better to use a video card and the program Hashcat to brute-force. The chances of success are very high, since MD5 is very quickly computed.
Example of hash cracking:
- C:\Users\Alex\Downloads\hashcat-3.10\ is a path to the folder where the Hashcat program is located
- hashcat64.exe is the program file, I have a 64-bit system
- --opencl-device-types 1,2 are certain fixes for my system
- -a 3 - mask attack selection
- -1 ?l?d?u is a custom character set, includes big and small letters, as well as numbers
- -m 0 is a hash number (for each hash type you need to look at its number in the reference. 0 corresponds to MD5)
- -i means enable the increment of the mask (increase the number of characters)
- --increment-min=1 means to start looking for hashes with single-character candidates in passwords
- --increment-max=8 means to stop the increment on 8 characters
- 8743b52063cd84097a65d1633f5c74f5 is the hash to be hacked
- ?1?1?1?1?1?1?1?1?1 is a mask (in this case 8 user-defined characters that are defined above).

To better understand the work of Hashcat, it is recommended to read its help and the Hashcat user manusl.
But sometimes you need to turn on the head, not bust on the video card. Let us look at an example:
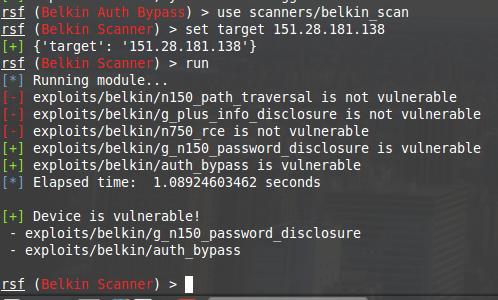
There is a router on 151.28.181.138. This is some kind of Belkin model. Respectively:

Two vulnerabilities at once. One is to bypass authentication, and the second is to reveal the password. I want a password!

It cannot be said that there is absolutely no result. As I said, MD5 is a good to brute-force, so I launch the command:
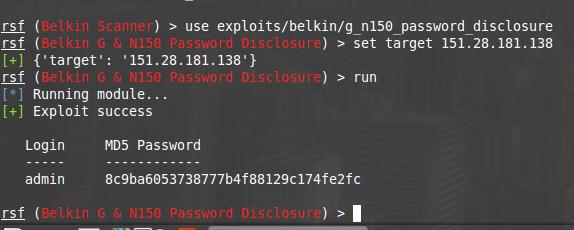
But while the system is noisy with fans, I decided to try the second exploit:

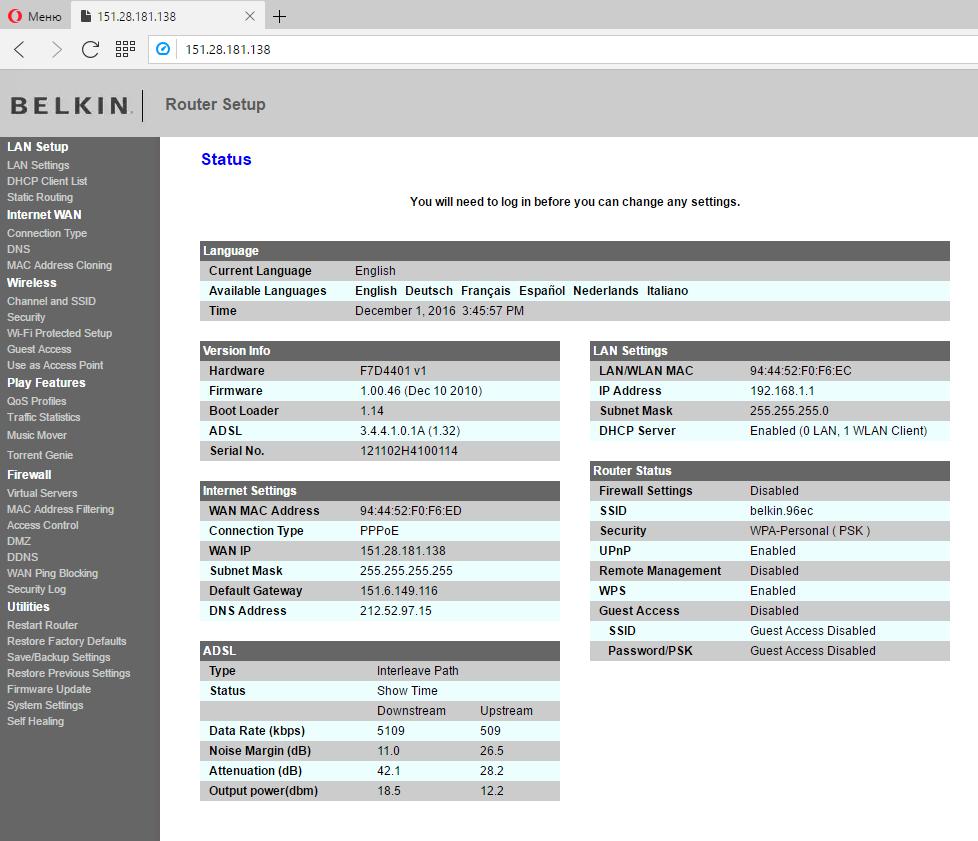
The exploit succeed and says I am inside. Apparently, you need to open a web-browser:

I am really inside. I can wander through the settings, but I accidentally saw my favorite "Save/Backup Settings" option.

I saved the backup file with the settings.
I open it and search for the "pass" keyword; there are several lines with such occurrences, including such two lines:
And although it is clear that this is not admin password, however, it is clear that the user tends to use the same passwords. What if…
Well exactly, 8c9ba6053738777b4f88129c174fe2fc is a hash of razorjack.
I click in the upper right corner of Logout, then Login with the password.
Cracking hashes from the /etc/shadow file
A little bit earlier, I got the following line from the /etc/shadow file of the router:
That is, the user name is rootforroute in the system, and the password is stored as a hash.
A few more examples from different systems (including Linux desktops):
Note the numbers 1 and 6 between the signs of $. In addition, there may be numbers 2 and 5. They mean the hash algorithm. The decoding is as follows:
- 1 = MD5
- 2 = Blowfish
- 5 = SHA-256
- 6 = SHA-512
In Hashcat, hashes have the following numbers:
In the string of the form
hash for cracking (there is still salt, but in this case it does not matter) is located between the first and second colon, i.e. in the given string, the hash for cracking is
In the command for Hashcat, you need to specify the corresponding hash number (-m 500), the following command is obtained for this particular example:
Another example of a sting from /etc/shadow:
Hash for cracking is also located between the first and second colons, it is
Specify the corresponding hash number (-m 1800):
Attack vectors when an attacker can change DNS settings
Some exploits can do nothing but change the DNS settings. Naturally, having a password from the administrator account, you can also change DNS. Even without an administrator password, but having the ability to execute commands on the router, you can edit the configuration file to change the name server settings.
Vulnerabilities that allows one to change the DNS settings lead to the following possible attacks:
Brute-force default router credentials with RouterSploit
RouterSploit allows ones to check the factory passwords of routers and brute-force the following services:
The standard ports for ftp, ssh, telnet, and snmp are ports 21, 22, 23, and 161 respectively.
Conclusion
RouterSploit has a good collection of exploits and quite a convenient organization of work with them for individual routers.

Как уже известно, Интернет вещей (IoT) стал одной из самых важных целей для хакеров в последние годы. Он включает в себя практически любые устройства, имеющие доступ в интернет, такие как маршрутизаторы, веб-камеры, детские мониторы, динамики и даже новые кухонные приборы.
Эти устройства имеют небольшой, простой компьютер, встроенный в них, как правило, с ОС Linux. В то время как многие из систем внедрили более безопасные протоколы и процедуры, эти устройства остаются в значительной степени незащищенными.
В последние годы такие атаки, как DDoS Mirai, взломали большую часть интернета, включая Twitter, Netflix и CNN. Целью становились, в основном, подобные незащищенные устройства. Злоумышленники компрометируют миллионы этих устройств, а затем используют их для проведения атак типа DDoS. С таким количеством устройств ни один сервер не является безопасным.
Теперь, когда маршрутизаторы и другие устройства были так эффективно использованы для проведения DDoS-атак почти в любой стране, больше внимания уделяется их безопасности. В результате был разработан инструмент, известный как Routersploit для того, чтобы упаковать вместе самые известные эксплойты маршрутизатора, подобные Metasploit. На самом деле разработчики постарались сделать интерфейс Routersploit похожим на Metasploit. Это должно сделать знакомство с Routersploit более быстрым для тех, кто уже знает, что такое Metasploit.
Шаг № 1: Загрузка и установка Routersploit
Первым шагом, конечно же, является загрузка и установка Routersploit. Прежде чем это сделать, нужно установить python3-pip из репозитория Kali.
После этого происходит замена каталога на новый каталог Routersploit.
Теперь есть возможность использовать файл requirements.txt в этом каталоге для загрузки требований Routersploit из pip.
После того, как все эти шаги были выполнены, просто нужно запустить rsf.py (Routersploit Framework), и пользователя встретит заставка Routersploit (как на картинке ниже).

Стоит обратить свое внимание на то, что график маршрутизаторов отображает его модули в нижней части экрана, как и Metasploit. Он имеет 127 эксплойтов , 4 сканера, 165 модулей доверия, 4 универсальных модуля и 21 модуль полезной нагрузки.
Шаг № 2: Изучение возможностей Routersploit
Теперь, когда Routersploit установлен, нужно немного изучить его. Точно так же, как и в Metasploit, пользователь может ввести команду show, чтобы Routersploit извлекал модули и отображал их на экране.
Сперва можно взглянуть на эксплойты:

Как можно увидеть, Routersploit имеет 121 эксплойт-модуль, которые классифицируются по производителю, модели и уязвимости. Хотя это, возможно, покажется довольно большим количеством, существуют десятки производителей маршрутизаторов и сотни моделей, так что эти эксплойты составляют всего маленькую часть от огромного количества. Например, существует 4 эксплойта Huawei для моделей HG866, HG520, HG530 и E5331. Конечно, следует найти эксплойт, который работает для конкретного производителя и модели пользователя.
Необходимо сделать такую же процедуру и для сканеров:

Как видно на картинке, есть всего 4 сканера.
Шаг №3: Функция поиска
Опять же, как и фреймворк Metasploit, Routersploit обладает функцией поиска, но не столь эффективной и мощной. В отличие от Metasploit, функция поиска не позволяет искать по типу модуля или платформы, пользователь просто ограничен поиском по ключевым словам.
Например, если он захочет увидеть все модули с ключевым словом «creds», следует ввести:

Будут показаны все модули «creds», а также несколько модулей, содержащих ключевое слово «creds».
Хотя пользователь и не может искать по типу или платформе, поиск по ключевым словам также весьма эффективен. Например, если у него целевой маршрутизатор, изготовленный компанией «Linksys», когда он введет ключевое слово «Linksys», Routersploit покажет все учетные данные и предоставит доступ к использованию необходимых модулей.

Шаг №4: Сканирование на наличие уязвимостей
Если нет полной уверенности, какой эксплойт использовать, и не волнует скрытность, Routersploit оснащен модулем с именем autopwn, который будет проверять маршрутизатор на наличие уязвимостей. Это модуль сканера. Он загружается точно так же, как и в Metasploit, с помощью команды use, за которой следует имя модуля.
![]()
Как и в Metasploit, можно использовать команду show options для отображения всех параметров и переменных для этого модуля.

Картинка выше дает понять, что нужно установить целевой IP-адрес, а все остальные настройки можно оставить по умолчанию.
После того, как пользователь установил IP-адрес, он производит действия, аналогичные с действиями в Metasploit.
В этом случае Routersploit не смог найти какие-либо уязвимости в этом маршрутизаторе, но обнаружил и вывел на экран учетные данные по умолчанию.

Шаг №5: Получение учетных данных маршрутизатора
Если нельзя использовать уязвимости маршрутизатора, то можно просто попытаться получить учетные данные и взять устройство под свой контроль. В большинстве случаев именно такие IoT-атаки обвенчались успехом за последние годы, поскольку много людей не изменяют учетные данные.
Пользователь может найти все модули учетных данных, введя:

Стоит обратить свое внимание на то, что существует множество модулей учетных данных, предназначенных для конкретного типа маршрутизатора и конкретной службы, такой как FTP, SSH и т.д.
Как только модуль загружен, следует выполнить следующие действия:

Как можно увидеть, этот модуль требует, чтобы пользователь ввел целевой IP-адрес, и он имеет встроенный список паролей в /root/routersploit/routersploit/resources/wordlist. Нужно оставить этот параметр по умолчанию. Пользователь может применить любой список слов из Kali или тот, который он загрузил, просто использовав переменную passwords в отношении абсолютного пути к списку слов.
Кроме того, этот модуль использует учетные данные admin по умолчанию. Можно также установить эту переменную в файл имен пользователей, но пока просто стоит применить это значение.
Для запуска этого модуля нужно просто ввести команду «run».

Затем данный модуль начнет пробовать все комбинации паролей с именем пользователя «admin».

Взлом устройств IoT стал одной из самых актуальных областей хакерства в последние годы. Routersploit имеет много полезных модулей для получения доступа к маршрутизатору, но также может использовать функцию поиска, чтобы найти конкретный модуль для работы. Несмотря на все это, Routersploit должен стать еще одним обязательным инструментом в наборе программ настоящего хакера.
Важно! Информация исключительно в учебных целях. Пожалуйста, соблюдайте законодательство и не применяйте данную информацию в незаконных целях.
The RouterSploit Framework is an open-source exploitation framework dedicated to embedded devices. If you want to evaluate the security of some devices (routers, cameras, etc.) and perform pen test, you can use RouterSploit framework.
Some Features:
Supported platforms:
- Linux (Kali, Debian, Ubuntu, CentOS), macOS/Mac OS X, Raspberry Pi, Windows, and unrooted Android phone also.

RouterSploit Install
Dependencies
Kali Linux:
For For Bluetooth Low Energy support, run the following:
Ubuntu (18.04 / 17.10):
For Bluetooth Low Energy support, run the following:
Running on Docker
Update:
Usage
Exploits
To preform the Exploitation, just pick the module and set the target:
For completion use tab key.
To display options, type show :
Use run or exploit command to exploit the target:
Run show info to display info about exploit.
Creds
Modules located under creds/ directory allow running dictionary attacks against various network services. Supported services:
Every service is divided into two modules:
To display the options and run, use the same commands as for exploit.
Scanners
Scanners allow quickly verify if the target is vulnerable to any exploits. Use the same commands to display/set options, and also to run.


You may be interested to learn more about: PowerShell Downgrade Attack – Magic Unicorn.

Большинство компаний сканируют инфраструктуру на наличие уязвимостей каждый квартал, но срок может варьироваться в зависимости от политики ITSM компании. После сканирования безопасности, если команда безопасности обнаружит уязвимости в определенной группе поддержки, например, Linux, Windows, Middleware или Network, она будет направляется к ним. После назначения команда создаст ЗНИ (запрос на изменение) на основе среды, такой как […]
Brave Browser – это действительно хороший браузер, ориентированный на конфиденциальность и безопасность, который обладает расширенными возможностями, такими как меньший объем памяти на вкладку по сравнению с Firefox и Chrome, что делает его очень быстрым и легким, он поставляется с криптокошельком, приватным окном через сеть TOR и многим другим. Есть много веских причин использовать Brave. Но […]
Если вы хотите оптимизировать свой веб-сервер, необходимо понимать access логи Nginx. Ведение логов (журналов) – это единственное критически важное действие, которое вы предпринимаете перед возникновением проблемы. Оно также играет свою роль в обнаружении дефектов в веб-разработке. Журналы доступа Nginx содержат подробную информацию о запросах пользователей. Для анализа и мониторинга вашего веб-сервера необходимо разбирать логи Nginx. […]
zANTI – это бесплатное приложение для Android, которое функционирует как мобильный набор инструментов для тестирования на проникновение, позволяющий оценить уровень риска сети с помощью мобильного устройства. zANTI позволяет менеджерам по безопасности оценить уровень риска сети одним нажатием кнопки. Этот простой в использовании мобильный инструментарий позволяет администраторам ИТ-безопасности имитировать продвинутого злоумышленника, чтобы определить вредоносные методы, которые […]
Следующая команда выведет ваш микрофон на динамик удаленного компьютера. dd if=/dev/dsp | ssh -c arcfour -C username@host dd of=/dev/dsp Система выведет звук с вашего микрофонного порта на порт динамика целевого компьютера по ssh. Качество звука очень плохое, поэтому вы услышите много шипения. Альтернативный вариант: arecord -f dat | ssh -C user@host aplay -f dat Вы […]
Читайте также:


